Sentora open source web hosting panel
Requirements: CentOS minimal installation
Sentora Compatible Operating Systems
The Sentora installer officially supports the following operating systems
- CentOS 6
- CentOS 7
- Ubuntu 12.04
- Ubuntu 14.04.
Operating systems not supported by Sentora
Some distributions derived from supported operating systems may work. You are free to use Sentora on unsupported systems at your own risk. Sentora's development team will not support unsupported distributions
Pre-installation verification
The installer is designed to be as simple as possible. Verify that all mandatory requirements are met
We recommend a minimal distribution installation.
There cannot be another server admin panel installed before installing Sentora.
There cannot be other web services (examples: Nginx, MySQL, Apache, PHP, FTP server, mail server, etc.) installed before installing Sentora.
Requerimientos adicionales
You MUST have a registered domain name and a subdomain that points to your server's IP,
The primary domain will be used to configure the mail service
The subdomain will be dedicated to accessing the Sentora panel.
Note:
You can use a free domain or alternatively buy one at: mxdigit.com.
You can run a limited functionality version of Sentora without DNS. Read more
Puertos requeridos por Sentora:
Por lo general, el VPS o el servidor dedicado no tienen necesidad de configurar el enrutador o firewall del host, pero es su responsabilidad instalar y configurar un firewall de software para asegurar su servidor.
Una vez que se configura un firewall, debe abrir estos puertos para permitir que funcione la configuración predeterminada de Sentora:
- 20 y 21: FTP
- 25 (TCP): SMTP
- 53 (TCP y UDP): DNS
- 80 (TCP y UDP): HTTP
- 110: POP3
- 143: IMAP
Optional:
If you have already configured (or will soon configure) SSL, you should also open
443: HTTPS
3306: MySQL
WARNING: You have to open port 22 if you use SSH otherwise you will not be able to continue after activating the firewall. Slightly out of reach since Sentora is no longer supported by Windows: Windows RDP uses port 3389.
To enable the required ports in Sentora, First we will check the status of our firewall we execute the following commands:
[root@serv ~]# systemctl status firewalld
● firewalld.service - firewalld - dynamic firewall daemon
Loaded: loaded (/usr/lib/systemd/system/firewalld.service; enabled; vendor preset: enabled)
Active: active (running) since Sat 2020-05-23 11:51:22 BST; 11min ago
Docs: man:firewalld(1)
Main PID: 27481 (firewalld)
CGroup: /system.slice/firewalld.service
└─27481 /usr/bin/python2 -Es /usr/sbin/firewalld --nofork –nopid
May 23 11:51:21 serv.dssdhost.com systemd[1]: Starting firewalld - dynamic f....
May 23 11:51:22 serv.dssdhost.com systemd[1]: Started firewalld - dynamic fi....
May 23 11:51:22 serv.dssdhost.com firewalld[27481]: WARNING: AllowZoneDriftin...
Hint: Some lines were ellipsized, use -l to show in full.
To enable the required ports in Sentora, we execute the following commands:
firewall-cmd --zone=public --add-port=20/tcp --permanent
firewall-cmd --zone=public --add-port=21/tcp --permanent
firewall-cmd --zone=public --add-port=22/tcp --permanent
firewall-cmd --zone=public --add-port=25/tcp --permanent
firewall-cmd --zone=public --add-port=53/tcp --permanent
firewall-cmd --zone=public --add-port=53/udp --permanent
firewall-cmd --zone=public --add-port=80/tcp --permanent
firewall-cmd --zone=public --add-port=80/udp --permanent
firewall-cmd --zone=public --add-port=110/tcp --permanent
firewall-cmd --zone=public --add-port=110/udp --permanent
firewall-cmd --zone=public --add-port=143/tcp --permanent
firewall-cmd --zone=public --add-port=143/udp --permanent
firewall-cmd --zone=public --add-port=443/tcp --permanent
firewall-cmd --zone=public --add-port=3306/tcp --permanent
We restart our firewall so that the changes are applied
# systemctl restart firewalld
Once ALL of the above conditions are met, you can start installing Sentora on your server.
Sentora Installation
If you have problems with curl you can try copy and paste this command (for CentOS):
# yum install wget -y && cd /tmp && wget sentora.org/install && bash insta
Alternatively, you can do it manually:
For the installation process it is necessary to take the session of the root user, we can take the section of the root user with the command (sudo or su)
We install the download manager (wget) to download the installation package with the following command:
# yum install wget
We download the installer with the following command (wget sentora.org/install) to download the installation package
[root@serv ~]# wget sentora.org/install
--2020-05-23 05:32:30-- http://sentora.org/install
Resolving sentora.org (sentora.org)... 96.64.149.205
Connecting to sentora.org (sentora.org)|96.64.149.205|:80... connected.
HTTP request sent, awaiting response... 302 Found
Location: https://raw.githubusercontent.com/sentora/sentora-installers/1.0.3/sentora_install.sh [following]
--2020-05-23 05:32:31-- https://raw.githubusercontent.com/sentora/sentora-installers/1.0.3/sentora_install.sh
Resolving raw.githubusercontent.com (raw.githubusercontent.com)... 151.101.16.133
Connecting to raw.githubusercontent.com (raw.githubusercontent.com)|151.101.16.133|:443... connected.
HTTP request sent, awaiting response... 200 OK
Length: 47103 (46K) [text/plain]
Saving to: ‘install.1’
100%[===================================================>] 47,103 --.-K/s in 0.03s
2020-05-23 05:32:31 (1.76 MB/s) - ‘install.1’ saved [47103/47103]
If you get a github certificate error, try one of the two lines below
# wget --no-check-certificate sentora.org/install
# wget http://sentora.org/install
4) We make the installer executable with the following command (chmod + x install)
# chmod +x install
5) We run the installer, at this point we must take into account that if our system is not a minimal installation, it is possible that the installation cannot continue, due to a previous installation of the packages such as: MariaDB, HTTP, DNS, etc.
# ./install
We follow the on-screen instructions during installation.
1) Select your TimeZone
Select your country from the pseudo-graphical interface (Ubuntu) or lists (CentOs).
2) Sentora subdomain
This is the domain name that you will use to access the control panel after installation (panel URL). This domain will be reserved only for the panel. You can change the dashboard subdomain later (see Change the Sentora subdomain), but any errors will prevent you from accessing the dashboard or you can even crash the entire server in case of domain conflict, so take the time to consider and understand BEFORE to validate!
It MUST be a subdomain of your primary domain. Enter the full name of the subdomain. (example: panel.midomain.com)
The installer will verify the validity of the subdomain: it MUST be set to DNS (and propagated) BEFORE running the installer.
We could edit the hosts of our server to add the subdomain required for Sentora, in our case we will use (panel.dssdhost.com), if not, the installation manager will overwrite our hosts adding the subdomain that we previously indicated.
We install the editor (nano) to edit the configuration of our hosts
# yum install nano
We edit the configuration of our hosts where (192.168.1.65) is the IPv4 of our system
# nano /etc/hosts
127.0.0.1 localhost localhost.localdomain localhost4 localhost4.localdomain4
::1 localhost localhost.localdomain localhost6 localhost6.localdomain6
192.168.1.65 serv.dssdhost.com
192.168.1.65 panel.dssdhost.com
192.168.1.65 autoreply.panel.dssdhost.com
FOR ADVANCED ADMINISTRATION ONLY: If you want to install a local server for local use only (test server), you will not be able to access it by domain until you configure a local dns (usually in router tables). You can enter any primary domain and subdomain you want (but remember that a primary domain has at least one dot).
3) Public IP of the server
The installer will propose the public IP it found from a command sent to the Sentora API website. It should be OK.
FOR ADVANCED ADMINISTRATION ONLY: If you are installing a local server for local use, you must enter the LOCAL IP (shown if different from public IP).
4) Confirmation
If you have any warnings before the confirmation question, Sentora WILL NOT WORK, partially fully powered up, as a public web server. You will be asked to confirm that you really want to install Sentora with these settings.
Confirm ONLY if you are sure you know what you are doing and at your own risk.
Installation will start only after this confirmation. If you abort here, you can restart the installer at any time - only very few changes have been made to your configuration (the installer may have installed only time zone packages).
When we confirm the installation, the automatic installation will begin. The changes applied will prevent you from running the installer again without reinstalling the operating system.
Once you have finished our installation we will find very important information to access our Sentora panel in addition to asking us to restart our system.
Congratulations Sentora has now been installed on your
server. Please review the log file left in /root/ for
any errors encountered during installation.
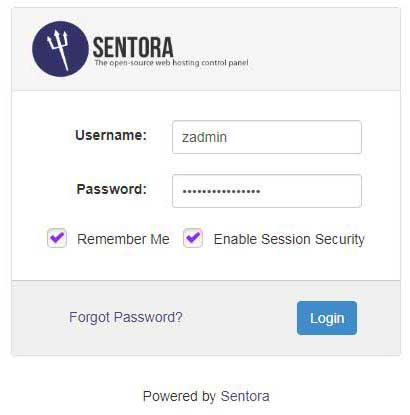
Login to Sentora at http://panel.dssdhost.com
Sentora Username : zadmin
Sentora Password : gFbBzElA0M9CnJ0B
MySQL Root Password : aq0pkAOhqMLGOcOb
MySQL Postfix Password : 2kDzG2rsNSSTcrIF
MySQL ProFTPd Password : 8WjAFND1SuRjv1AW
MySQL Roundcube Password : ieDh7tqUTePAdUeV
(theses passwords are saved in /root/passwords.txt)
########################################################
Restart your server now to complete the install (y/n)?
We restart our system and access our Sentora panel.
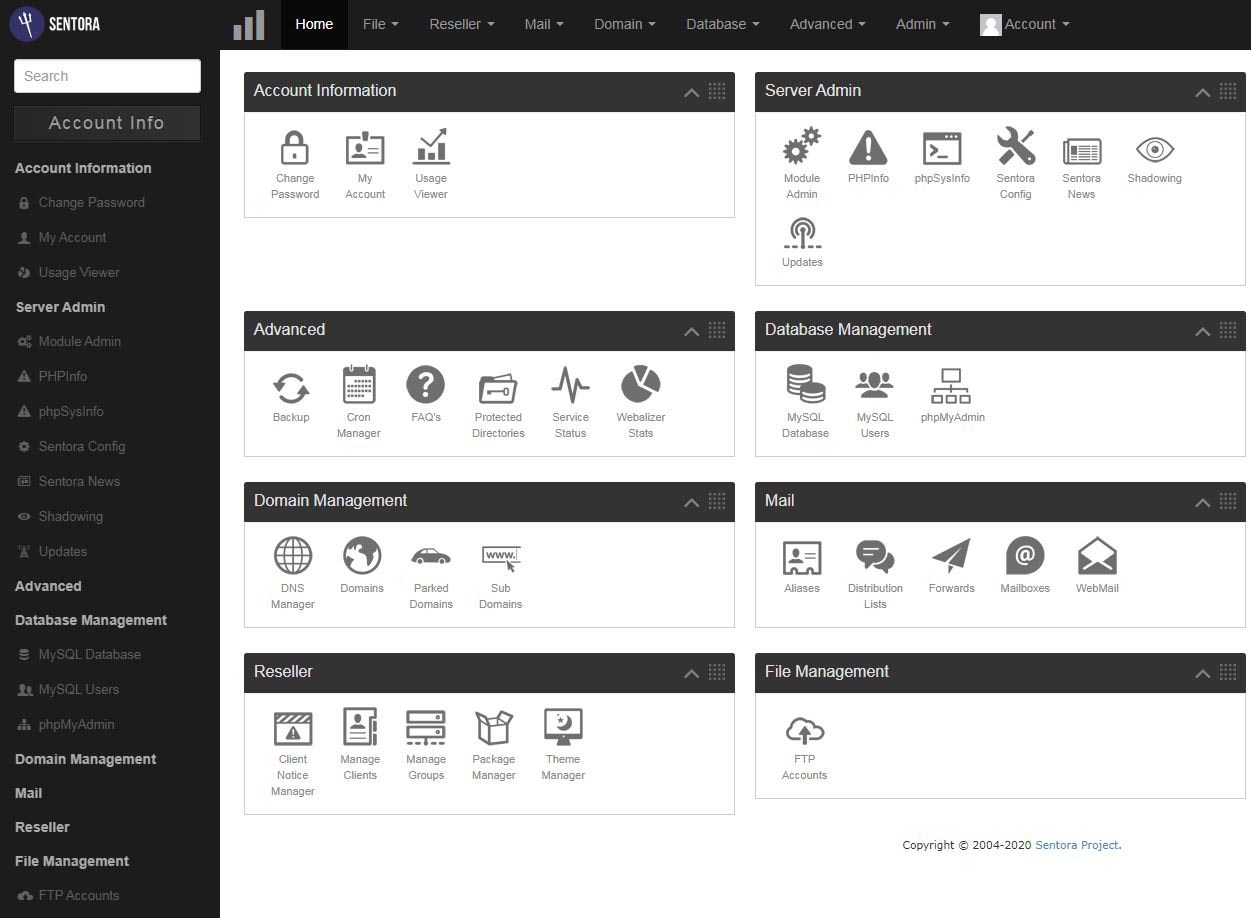
Finally in our Sentora web panel.